Showing posts with label Battleboards. Show all posts

Monday, 16 July 2018

A little activity

It has been a long time between posts! Life just gets busy.

I haven't painted a great deal, though I have had a few games, mainly 40k and we did try out the new Age of Sigmar on the weekend. Overall, not too bad.

However, all that gaming got me interested in doing some painting, so I finished off one of my wip boards for 40k.


I quite like the detail on the board, and I think it will work well with the upcoming 40k Killteam. I figure I might paint up some off my buildings (which I have a few), and at least get this section of the board painted before doing another. 

Anyways, it's been nioce to finish off and will be fun to game on.

That's all for now, will see if I have anything else to post in the next 6 months. 

Cheers!

Saturday, 4 October 2014

Battle of Krap'r Tower

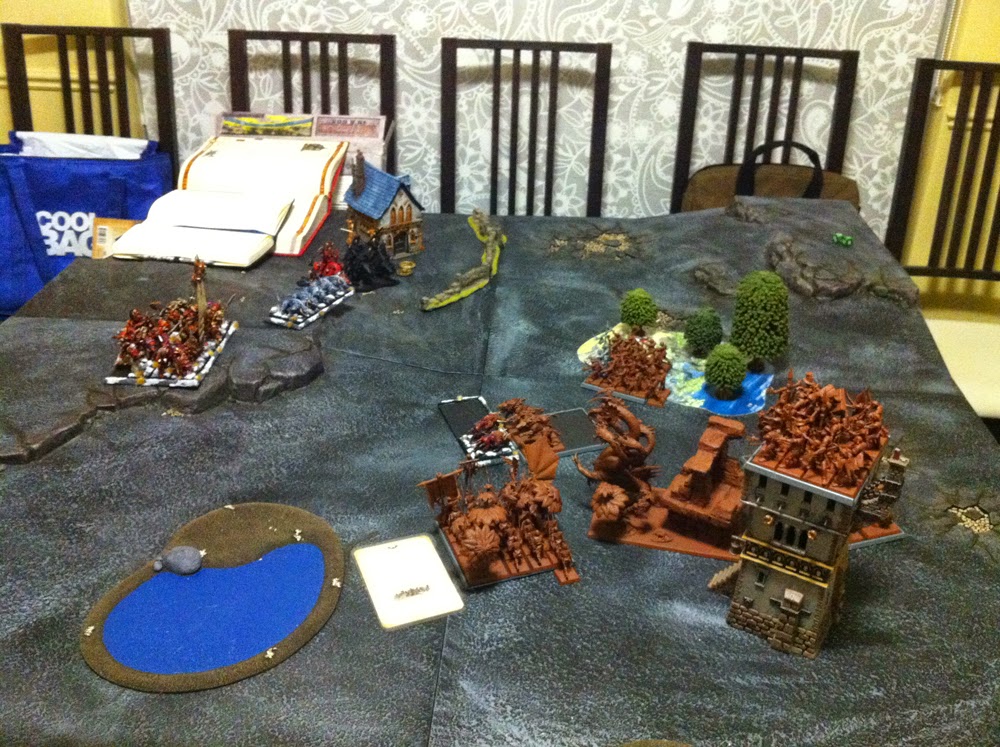
This battle took place a few weeks ago, which uses those lovely GaleForce 9 water features I have already mentioned. This was a 1600 pts Battle line game that took place near Krap'r Tower. One day we wil do that particular scenario, though I am sure you can make a guess as to what it is.

Anyways, I took my Chaos Warriors, as I was in the mood for them recently, that and they are mostly painted. Here is the list I took.
'The Tormentor' Chaos Sorceror Lord (Lv 4, Flaming Breath, Talisman of Endurance, Enchanted Shield, Mark of Tzeentch, Soul Feeder, Sword of Might)

'Astaroth' Exalted Hero (BSB, Talisman of Protection, Mark of Tzeentch, Daemonic Steed, Third eye of Tzeentch, Shield)

20 Warriors of Chaos (Full Command, Mark of Tzeentch, Shields, Banner of Discipline)

5 Warhounds

5 Warhounds

8 Chaos Trolls (Additional Hand Weapons)

3 Skull Crushers (Ensorcelled Weapons)

I like Tzeentch so that's what I took for most of my units, apart from the Skull Crushers of course. I really wanted to try them out again, to see if inspiration would strike me to actually finish painting them, or perhaps they would die horribly.

Here is my friend Cail's Army, themed around Haarkon's Undead Reavers (awesome theme).
'Haarkon' Vampire Hero

Vampire Hero BSB

lv4 Necromancer

20 Skeletons

20 Zombies

20 Zombies

6 Dire Wolves

6 Dire Wolves

8 Crypt Ghouls

Terrorgiest

Not too sure about the equipment, but I'm sure there is some of the usual items for the heroes.

 This shot looking very 'cool'. My general joined the Warriors, and the BSB took his usual home in with the trolls. The water features do look quite nice I think you'll agree. 
 I get turn 1. I declare some charges on the vanguarded Dire Wolves. Considering that its been awhile since I had a game, I charged the trolls into the wolves, intending to overrun past that undead unit (with Haarkon, and vampire BSB), on the right, further into his lines. In hindsight, a very stupid move, and my friend knows it, as he now has it on film.
 The rest of the army looks on. I also foolishly decided not to move the Warriors, which meant I was out of range for my spells. Again, not thinking.
 It may not seem I have moved, but my trolls wiped out the wolves, tried to over run, and ran 2".
 His turn 1, he charges, and kills and runs down my trolls and BSB. I think I 'ran' 4" or something. Terrorgeist looms scary in the middle. Other units shuffle around, his lv4 necromancer with the zombies goes into the tower, and will spend the rest of the game, raising more and more into that tight cramped space.

 My turn 2, the Skullcrushers make a long charge against the zombie unit in the forest, wipe them out and overrun into the side of the Crypt Ghouls. My trolls should have taken lessons. I send in the second unit of warhounds into the centre to help out the last lot. Seriously thinking of upgrading them to Maruader Horse...You'll also notice the absence of the Terrorgeist, who I managed to magic off with Gateway!

 Face off between my main unit and the unit with Haarkon and the vampire BSB. I decide not to charge, in order to cast another lot of spells.
 So in his turn he charges, Rolls okay, does 2 wounds in total, I roll like an idiot, bolstered by the 5+ regen save I gave him (thanks Tzeetch magic), and do hardly anything. I lose by 1 or 2, break and get run down. My Skullcrushers however systematically crush and decimate his unit of Crypt Ghouls.
 That 1 model that I failed to kill in the centre with the warhounds, gets raised to full and put in the way of my remaining Skullcrushers.
I charge, kill the wolves, and overrun into the Haarkon unit. In a desperate gamble, I put all my attacks on Haarkon and manage to take him out! I loose the combat, but pass the check. Game over!

Very clearly a massive win for Cail! Well done!

Post Game Thoughts...
I can't really blame the dice (cept for the Warriors combat), as I really didn't play well, taking stupid chances and then they turned bad real quick. The only redeeming unit in my army was the Skullcrushers. Smashing through 20 Zombies, 8 Crypt Ghouls, 6 Dire Wolves, and Haarkon himself. Not a bad outing for the only unit not painted in my army! Unsurprisingly, they are on my painting table as I type this.

However it was great to get a game, especially with the new water features, and its always great to learn from a loss. Next time Haarkon! Next Time!

Thanks for looking!

Cheers!


Wednesday, 4 June 2014

Trouble Underground Battle IV

Here is a battle a friend and I played a few weeks ago. It is the 4th in a series of 5 games. We decided (a long time ago) to play through the 5 underground games from the Blood in the Badlands book as something different as opposed to playing just random games. The deal with these games is that if the attacker loses a game, that's it, campaign over.

The first game is the Night Goblins first forray into the underground realm, so pits an assault force of 1500pts against a patrol of 1000pts of Dwarfs. Shockingly I won the first game and nearly won the second (all down to the last roll of the game!).

The second game was where he was poisoning the wells. Which he did in such a fashion that I now had a 100 point disadvantage in every game for the rest o the campaign.

The 3rd game was to stop the Night Goblins destroying some structure pillars. This one was a draw, so he could still continue the campaign, but I lost nothing.

So this here is the 4th game in out little series. There are two big Dwarf Runepillarspraycans, very important structures. This game was a good size, 2k a side with me having an additional 500points that come on as ambushers.For the ambushers, I decided their role would be to claim the enemy held pillar, so I made them a 20 strong unit of Longbeards and a character in there as well.

Dwarf deployment, so good to have it all painted!
Orc and goblin deployment. The giant mangler is actually just a giant for this game.


Believe it or not, my Dwarfs didn't move much this battle.
The Hoard surges forward!
Those random critters around just turned up for this game. They are actually trolls and squigs jumping about. There are also stalactites that fall, but they were more attracted to my unit of GW Warriors. Go figure.
Blue Moon brew helped the Dwarfs keep their resolve.
The line is coming closer.
Organ gun fires at the goblins. I love that machine in this current edition. It now does more than blow up!
A fanatic gets close to me Iron Breakers. They break no sweat.
My Longbeards arrive! They decided to arrive on the rocky out crop as that Mangler bouncing around the back looks trouble. Also I love rolling lots of DT checks and making long charges.
This here represents a few failed annimosity checks, hence the non movement. Fine by me!


Mangler gets close to the Longbeards. This is where I wish they were Rangers.
Goblins finally flee from the Organ Gun shooting. The rest of the army, being punished by the shooting, decide to consolidate to their half of the field.
Dwarfs cheer! And drink Beer!


Longbeards decide to make a break for the pillarcan. They make a long charge at the giant. Against S7, it doesn't last long at all.
Final turn. The mangler clips my Longbeards and kills a few, while the goblins (and front row of big bosses with GW), attack and cause them to flee. They get away from them though.

So a draw, but a very close one for the Orc's and Goblins! Now are up to the last scenario, where it is 2500pts or 3000pts a side. Should be epic! I should not that throughout this game, we drank some fine Blue Moon brew and had Face Off playing in the background. Just epic.

Thanks for looking.

Cheers!

Monday, 30 December 2013

Battleboard number 5

Probably going to be my last post for the year. Thought I'd show the completed Battleboard number 5. Usual method to painting, with mainly shades to add some depth (Agraz and Nuln Oil), and a lot of bleached bone (or Ushabti) for the skulls. Oh and there is a lot of skulls. So many, that I'm glad I don't have to do another section like this!


After this, there is only 1 more board to paint, and then that is all of the boards! Can't wait to take a finished photo of the lot. Finally the dream of owning a completely painted gaming table is close!

Well, back to it.

Cheers!

Saturday, 7 December 2013

Siege!

Last weekend my friends and I got round to playing the end of season game for our Blood in the Badlands Campaign. The game originally had a few boards being played on at the same time, however due to on player not being able to make it, we only played on one board. So it was a siege game of 2400pts. My Dwarfs were up against 1200pts of Night Goblins and 1200pts of Lizardmen. What follows are some pics and comments from the game. I do hope I remembered it right!

 The siege is set. The objectives are all at this end of the castle, so I put all my Dwarfs and siege engines there. My artillery claimed the hill to fire on the castle. I made sure they were out of bow range as well.
 The amount of magic I was going up against. I'm sure there were some kniving plans being made.
 The Dwarf army arrayed for battle. I took a siege tower to bypass the fortifications and a siege ram to have a go at the gate section. Then there is 30 Warriors with Great Weapons on the far left, 32 Iron Breakers with Grimwald and bsb in the middle, and finally 30 Lond beards with Great Weapons in the siege tower.
 The Dwarf artillery consisted of 2 cannons, 2 grudge throwers and 2 bolt throwers. Their objective was to get more dice for the pre game artillery turns and then attack the enemy warmachines.
 Lizardmen Temple Guard at the gate surrounded by warmachines and saurus warriors to the left. At this stage I didn't know how tough saurus would be in a siege. A little spoiler, they are tough.
 Dwarf 1st turn sees two charges get off, my warriors rolled very low, and just sauntered a few inches.
 Combat saw my Iron Breakers bounce off the temple guard and the long beards bounce off the tower due to a lucky steadfast roll.
 Enemy turn sees them move a few units around the battlements, and the others at the other end of the caste, suffle along.
 Dwarf turn 2 sees more assaults going against the walls. All my units bounce off, though the far left tower is ready to fall to my 30 Warriors next turn. The Iron Breakers just do poorly against the Temple Guard again. Not enough strength to get the wounds through.
 Artillery on the other hand do very well. The cannons got removed in the pre battle phase, but since I didn't rune up any war machines, I just went for quantity. The grudge throwers by turn 2 have effectively wiped out the enemy war machines.
 Enemy turn 2 sees more shuffling along.


 At this stage it looks quite good for the Dwarfs, still lots of models. I'm sure nothing could ruin this...


 Here you see my forces at the end of the turn 2 magic phasse. They got 1 spell off, a Curse of the Badmoon with Irresistable force. I effectively lost 1/3 of my army. The warriors took the brunt of it losing 23 models.
 My turn 3 I try and see if there is any point in continuing. Close combat sees the remains of the warriors claim the tower (at last). Whereas everything else fails to do anything significant.
And that is where I called it, 3 turns in. Undone by 1 spell in a magic phase! Ah well, it was great to see the castle in action and have a siege game. It has been a very long time since we have had any games like this so I'm sure I've done things wrong. In the game I thought that those in the castle have stubborn or steadfast, which made shifting them very hard. I also think in hindsight that the Iron Breakers just were not strong enough to do any damage, perhaps Hammerers would have been better? Still, some things worked really well, such as the vast artillery which does a lot of damage on those walls. The siege tower as well proved a worthy investment, though perhaps next time I'll put another unit in there.

Still that wraps up the Spring campaign for now. We might get another campaign turn in before the ned of the year, but we shall see. Still it was a very cool and characterful game. One of these campaign games has to be a win for the forces of order? Surely!

Well better get cracking on painting.

Cheers.